Equipment :
1.laptop Compaq presario with hp integrated bluetooth wireless
2.z530i with maxis prepaid wap / gprs data enabled.
Step :
1. Enable the bluetooth device at the laptop.

for this laptop.. the bluetooth and wifi button is the same one. haha..
you may also see the icon at the taskbar if everything is just fine.
2. the next thing is just to enable bluetooth on the phone.
make it visible.and just need to right click over the icon.
for the first time may be you need to search for bluetooth device first. at Other Devices.
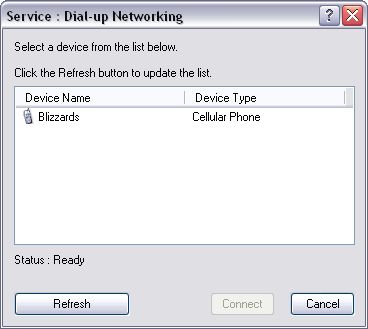
click the connect button..
and something like this will appear..

and…
if sucessful.

connected…
that’s all for normal / smooth run.. haha..
for troubleshooting.. you may need to know these..

the phone number is *99# ..
the COM port for modem is not the same as serial for bluetooth.. but anything other than that..
bcoz the DUN is offered directly via bluetooth .. so no need to add another manual modem link via serial or what so ever.
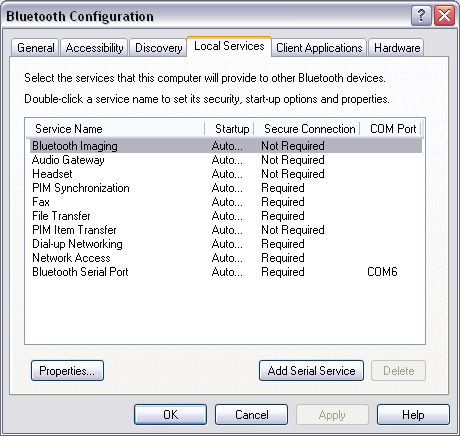
local services .. the one offered by the laptop..
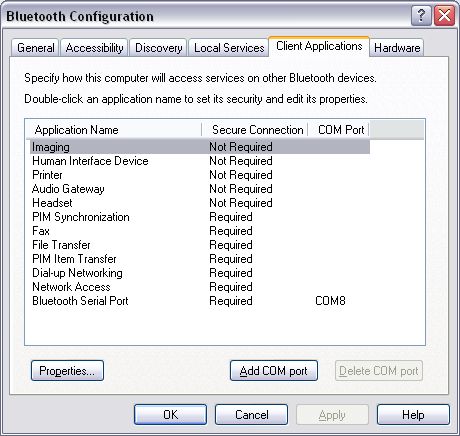
while client are the services offered by the phone itself..
can see here the serial is attached to COM6 and COM8..
and realize that the DUN ( Dial-Up networking ) via bluetooth must be other than these two…
which is differ if you want to add a manual serial link for modem…
… and one more thing… before dialing..
if you like to diagnoze the modem first..

wait for a while… or you might want to check the phone if any button have to be clicked to allow laptop to
connect to it..
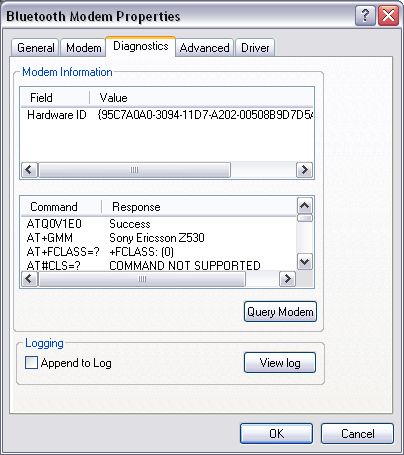
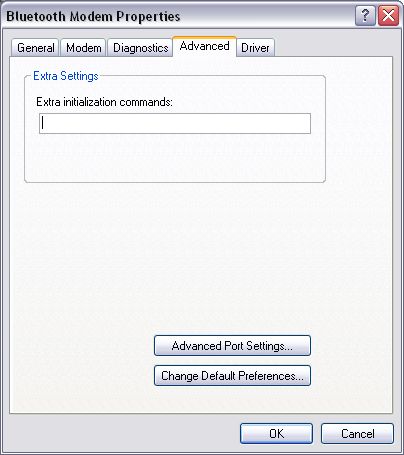
and another different is.. leave the initialization script as empy..hahaa
while some other need some string for initializing….
this one doesn’t need any of it..
the common string for other ..
+CGDCONT=1,”IP”,”net”<— maxis.

The Loopback Adapter and Windows file share tunneling: XP and 2003
The following instructions document how the Microsoft Loopback Adapter can be installed and configured for use with file share tunneling on Windows XP and 2003:
1. Installing the Loopback Adapter:
1. Open Start, Control Panel, Add Hardware.
2. Click Next on the introduction dialog box.
3. Select ‘Yes, I have already connected the hardware’ and click Next.
4. Scroll to the bottom of the list of hardware, select ‘Add a new hardware device’, then click Next.
5. Select ‘Install the hardware that I manually select from a list (Advanced)’, then click Next.
6. Select ‘Network adapters’, then click Next.
7. Select ‘Microsoft’ as the manufacturer, select ‘Microsoft Loopback Adapter’ as the adapter, then click Next.
8. Click Next to confim the installation.
9. Click Finish to complete the installation.
2. Configure the newly created adapter:
1. Open Start, Control Panel, Network Connections.
2. Select the newly created connection (should be named ‘Local Area Connection N’, where N is its order number).
3. Right click on the selected connection and choose Properties from the menu.
4. Confirm that ‘Microsoft Loopback Adapter’ (or ‘Microsoft Loopback Adapter #N’) is displayed in the ‘Connect Using:’ field. If it isn’t, return to step 2 and retry properties for another adapter.
5. Uncheck (disable) everything except ‘Internet Protocol (TCP/IP)’.
6. Select ‘Internet Protocol (TCP/IP)’, then click Properties to open ‘Internet Protocol (TCP/IP) Properties’.
7. Select ‘Use the following IP address:’ and fill in the ‘IP address:’ and ‘Subnet mask:’ fields (e.g. 10.10.10.10, 255.255.255.0).
8. Click Advanced to open ‘Advanced TCP/IP Settings’.
9. Switch to WINS and select ‘Disable NetBIOS over TCP/IP’.
10. Click OK to close ‘Advanced TCP/IP Settings’.
11. Click OK to close the ‘Internet Protocol (TCP/IP) Properties’.
12. Optionally (on XP only) uncheck (disable) ‘Notify me when this connection has limited or no conectivity’ to remove the connection warning icon from the system notification area.
13. Click OK to close the connection properties.
If you later want to uninstall the Microsoft Loopback Adapter (once it is not needed any more for the forwarding of a Windows file share), you can uninstall it using Control Panel > System > Hardware > Device Manager.
Tunnel Windows shares
Main page
MSLA on WinXP/2003
MSLA on Windows 2000
MSLA on Windows NT4
Various tips
How-Tos and Tutorials
How the internet works
Using WinSSHD for SFTP
Port forwarding guide
Tunnel Remote Desktop
Tunnel Windows shares
Tunnel WinVNC
Try out WinSSHD!
WinSSHD is an advanced SSH server for Windows with secure remote access, file transfer and tunneling features. Supports public key authentication, SCP, SFTP. Its advantages include speed, reliability, ease of use, configurability, and bvterm – the best remote console on the Windows platform. Try it free for up to 30 days!
Try out Tunnelier!
Tunnelier is a friendly and flexible SSH client for Windows which includes state of the art terminal emulation, graphical as well as command-line SFTP support, an FTP-to-SFTP bridge, powerful tunneling features, and also remote administration for WinSSHD. Free for individual use!
Hence, it can be concluded that cranes are here to stay as they are indispensable in certain industries.
He’s not the owner, but with perseverance, he did make it to the management level and is able to offer a lot to the company he works for and in return, he’s been noticed.
Since there are several firms offering truck dismantling
services, you would need to carry out some groundwork to choose the best firm.